RecyclerView ?
RecyclerView는 한정적인 화면에 많은 데이터를 넣을 수 있는 View 입니다.
Recycle을 한국어로 하면 재활용하다 라는 뜻입니다.
즉 View를 재활용해서 사용하겠다는 말입니다.

비슷하게 역할을 하는 ListView와 비교해서 설명해보겠습니다.
위와 같이 동작하는 ListView와 RecyclerView가 있다고 할때
ListView
ListView는 사용자가 스크롤 할 때마다 위에 있던 아이템은 삭제되고,
맨 아래의 아이템은 생성 되길 반복합니다.
아이템이 100개면 100번을 삭제 생성을 해야합니다.
즉 계속 삭제와 생성을 반복하므로 성능에 좋지않습니다.

RecyclerView
RecyclerView는 ListView의 단점을 보완하기 위해서 나왔습니다.
사용자가 스크롤 할 때, 위에 있던 아이템은 재활용 돼서 아래로 이동하여 재사용 합니다.
즉 아이템이 100개여도 10개정도의 View만 만들고 10개를 재활용해서 사용합니다.
View를 계속 만드는 ListView의 단점을 보완한 겁니다.

두개중에 무엇을 쓰냐고 하면 당연히 성능에 좋은 RecyclerView를 많이 씁니다.
요즘 앱들도 한정된 화면에 많은 데이터를 넣기 위해 RecyclerView를 많이 쓰고 있습니다.
RecyclerView는 기본입니다! 중요합니다!
RecyclerView 사용하기전 알고가자!
RecyclerView를 사용하기 위해서는 몇 가지의 필수 요소를 알아야 합니다.
그중에 2개만 먼저 알고 가보도록 해요.
Adapter
Adapter란 데이터 테이블을 목록 형태로 보여주기 위해 사용되는 것으로,
데이터를 다양한 형식의 리스트 형식을 보여주기 위해서 데이터와 RecyclerView 사이에 존재하는 객체이다.
-즉 데이터와 RecyclerView 사이의 통신을 위한 연결체이다.
ViewHolder
ViewHolder란 화면에 표시될 데이터나 아이템들을 저장하는 역할 입니다.
RecyclerView의 개념을 적용하기위해선 스크롤 해서 위로 올라간 View를 재활용하기 위해서 이 View를 기억하고 있어야 합니다.
ViewHolder가 그역할을 합니다.
RecyclerView 사용하기.
시작하기전에 RecyclerView에 ViewBinding을 사용하기 위해서 추가해준다.
(ViewBinding을 사용해야 쉽게 만들 수 있습니다!)
혹시 ViewBinding을 모른다면 배우고 오시면 좋을 것 같습니다.
어렵지 않아요!
android {
        ...
        viewBinding {
            enabled = true
        }
    }

파일구조는 이렇습니다. 순서대로 진행해 보아요.
1. activity_main.xml

<?xml version="1.0" encoding="utf-8"?>
<LinearLayout xmlns:android="http://schemas.android.com/apk/res/android"
    xmlns:app="http://schemas.android.com/apk/res-auto"
    xmlns:tools="http://schemas.android.com/tools"
    android:layout_width="match_parent"
    android:layout_height="match_parent"
    android:orientation="vertical"
    android:background="#FFFA99"
    tools:context=".MainActivity">

    <TextView
        android:layout_width="wrap_content"
        android:layout_height="wrap_content"
        android:text="RecyclerView"
        android:textSize="40sp"
        android:textColor="@color/purple_500"
        android:textStyle="bold"/>

    <androidx.recyclerview.widget.RecyclerView
        android:id="@+id/rv"
        android:layout_width="match_parent"
        android:layout_height="match_parent"
        android:background="@color/white"
        android:layout_marginTop="30dp"
        android:layout_marginBottom="30dp"/>
</LinearLayout>
2. item_recyclerview.xml

<?xml version="1.0" encoding="utf-8"?>
<LinearLayout xmlns:android="http://schemas.android.com/apk/res/android"
    android:layout_width="match_parent"
    android:layout_height="100dp">
    <LinearLayout
        android:layout_width="match_parent"
        android:layout_height="80dp"
        android:layout_marginTop="10dp"
        android:background="#E3D2DD"
        android:orientation="horizontal">
        <TextView
            android:id="@+id/rv_name"
            android:layout_width="wrap_content"
            android:layout_height="wrap_content"
            android:text="name"
            android:textSize="32sp"
            android:layout_gravity="center"
            android:layout_marginStart="30dp"/>
        <TextView
            android:id="@+id/rv_age"
            android:layout_width="wrap_content"
            android:layout_height="wrap_content"
            android:text="age"
            android:textSize="32sp"
            android:layout_gravity="center"
            android:layout_marginStart="18dp"/>
    </LinearLayout>
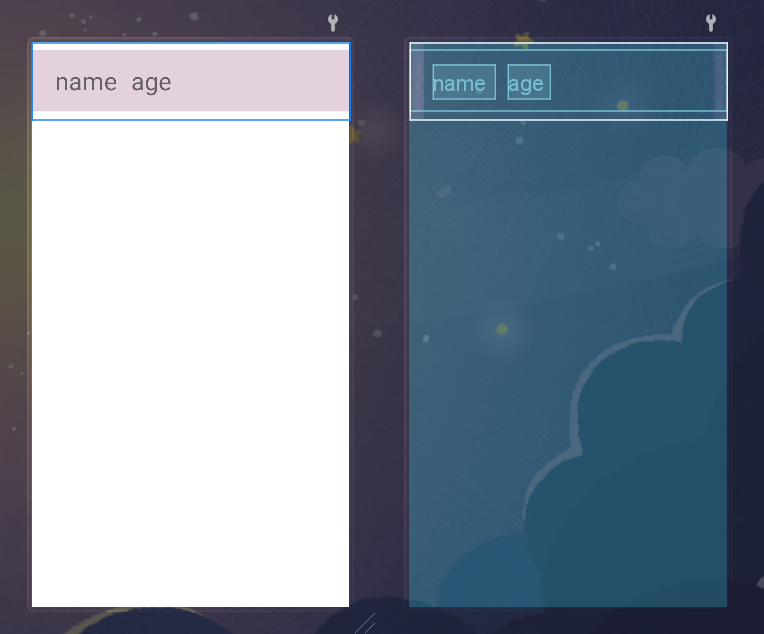
</LinearLayout>RecyclerView에 들어갈 아이템들을 만드는 것입니다.
3. Profile
data class Profile(val name : String, val age : Int)data class 하나를 만들어 줬습니다.
4. CustomAdapter
RecyclerView에 adpater를 연결해 줘야 하는데 그 adpater를 만드는 것입니다.
이 부분은 같이 만들어 보아요!
class CustomAdapter : RecyclerView.Adapter<CustomAdapter.Holder>() {
}
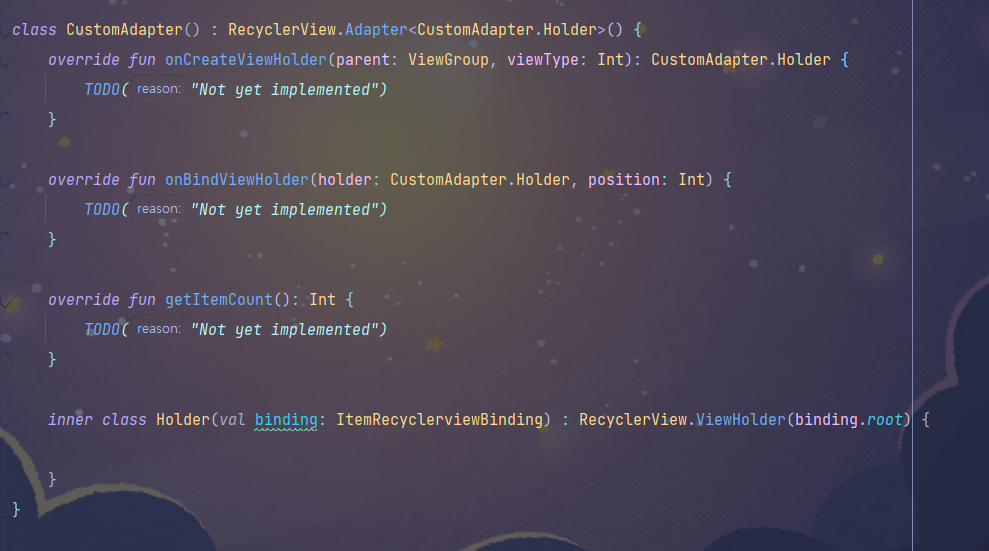
CustomAdapter 클래스를 만들고 이 클래스를 Adapter로 사용하기 위해선 RecyclerView.Adapter를 상속 받아야 합니다.
< > 여기안에는 뷰홀더를 넣어줘여하는데 inner class로 만든 Holder를 넣을거기때문에 CustomAdapter.Holder를 넣어주시면 됩니다. 저렇게 치면 이렇게 됩니다.

class CustomAdapter() 에 빨간 밑줄이 뜨는 이유는 상속 받은 RecyclerView.Adapter의 필수 구현을 안해줘서 그렇습니다.
Holder에 빨간 밑줄이 뜨는 이유는 아직 innerClass로 Hodler 클래스인 ViewHolder를 안만들어서 그렇습니다.
같이 해결해 보도록 하겠습니다.
저 상태에서 ctrl + i 를 누르면 RecyclerView.Adapter의 필수 구현들을 구현할 수 있습니다.

ctrl + i 누르면 이 화면이 나오는데 전부 선택해서 ok 를 누르시면 됩니다.
class CustomAdapter() 에 빨간 밑줄이 사라졌을 겁니다.
Holder 빨간 밑줄도 해결해 보겠습니다.

inner class로 Holder 클래스를 만들고 생성자로는 viewBinding으로 받아올 binding을 넣습니다.
그리고 이 클래스는 뷰홀더로 사용할거기 때문에 RecyclerView.ViewHolder를 상속받아야 합니다.
생성자로는 바로이전에 만든 binding의 root를 넣어주시면 됩니다.
이제 binding으로 RecyclerView에 들어갈 Item을 만든 xml에 접근해서 사용이 가능합니다.
inner class Holder(val binding: ItemRecyclerviewBinding) : RecyclerView.ViewHolder(binding.root) {
    val name = binding.rvName
    val age = binding.rvAge
}이렇게 접근해서 초기화 및 수정을 할 수 있습니다.
class CustomAdapter(val profileList : ArrayList<Profile>)그리고 CustomAdapter 생성자에 ArrayList<Profile> 받겠다고 선언 합니다.
Profile은 3번에서 만든 data Class 입니다.
override fun getItemCount(): Int {
    return profileList.size
}

override fun onCreateViewHolder(parent: ViewGroup, viewType: Int): CustomAdapter.Holder {
    val binding = ItemRecyclerviewBinding.inflate(LayoutInflater.from(parent.context), parent, false)
    return Holder(binding)
}

override fun onBindViewHolder(holder: CustomAdapter.Holder, position: Int) {
    holder.name.text = profileList[position].name
    holder.age.text = profileList[position].age.toString()
}이제 상속받아서 구현해야될 3가지를 구현해봅시다.
override fun getItemCount(): Int {
return profileList.size
}
생성자로 받은 profilerList의 사이즈를 반환 하면 됩니다.
override fun onCreateViewHolder(parent: ViewGroup, viewType: Int): CustomAdapter.Holder {
val binding = ItemRecyclerviewBinding.inflate(LayoutInflater.from(parent.context), parent, false)
return Holder(binding)
}
holder.name.text = profileList[position].name
holder.age.text = profileList[position].age.toString()
}
매개변수로 있는 position은 아이템중 지금 아이템이 몇번째 아이템인지 알려줍니다.
class CustomAdapter(val profileList : ArrayList<Profile>) : RecyclerView.Adapter<CustomAdapter.Holder>() {
    override fun getItemCount(): Int {
        return profileList.size
    }

    override fun onCreateViewHolder(parent: ViewGroup, viewType: Int): CustomAdapter.Holder {
        val binding = ItemRecyclerviewBinding.inflate(LayoutInflater.from(parent.context), parent, false)
        return Holder(binding)
    }

    override fun onBindViewHolder(holder: CustomAdapter.Holder, position: Int) {
        holder.name.text = profileList[position].name
        holder.age.text = profileList[position].age.toString()
    }

    inner class Holder(val binding: ItemRecyclerviewBinding) : RecyclerView.ViewHolder(binding.root) {
        val name = binding.rvName
        val age = binding.rvAge
    }
}전체 코드 입니다.
5. MainActivity
class MainActivity : AppCompatActivity() {
    private val binding by lazy { ActivityMainBinding.inflate(layoutInflater) }

    override fun onCreate(savedInstanceState: Bundle?) {
        super.onCreate(savedInstanceState)
        setContentView(binding.root)

        val profileList = ArrayList<Profile>()
        profileList.add(Profile("홍길동", 20))
        profileList.add(Profile("홍길동", 21))
        profileList.add(Profile("홍길동", 22))
        profileList.add(Profile("홍길동", 23))
        profileList.add(Profile("홍길동", 24))
        profileList.add(Profile("홍길동", 25))
        profileList.add(Profile("홍길동", 26))
        profileList.add(Profile("홍길동", 27))
        profileList.add(Profile("홍길동", 28))
        profileList.add(Profile("홍길동", 29))
        profileList.add(Profile("홍길동", 30))
        profileList.add(Profile("홍길동", 31))
        profileList.add(Profile("홍길동", 32))
        profileList.add(Profile("홍길동", 33))
        profileList.add(Profile("홍길동", 34))
        profileList.add(Profile("홍길동", 35))
        profileList.add(Profile("홍길동", 36))
        profileList.add(Profile("홍길동", 37))

        binding.rv.adapter = CustomAdapter(profileList)
        binding.rv.layoutManager = LinearLayoutManager(this)
    }
}profileList를 만듭니다. 이부분은 설명은 생략합니다.
binding.rv.adapter = CustomAdapter(profileList) : 리싸이클러뷰 어댑터에 우리가 만든 어댑터를 설정하는 부분입니다.
binding.rv.layoutManager = LinearLayoutManager(this) : 리싸이클러뷰가 어떻게 표시될지 layoutManger를 설정해야합니다. 우리는 LinearLayoutManager로 설정합니다.
실행하면 리싸이클러뷰가 정상작동 할겁니다.
설명할 부분이 너무많아서 생략한것도 많은데 이해안가시는 부분 있으면 댓글로 알려주세요.
봐주셔서 감사합니다.
//클릭이벤트 추가 - 필요하신분 따라하세용
class CustomAdapter(val profileList : ArrayList<Profile>) : RecyclerView.Adapter<CustomAdapter.Holder>() {
    interface ItemClick {  //클릭이벤트추가부분
        fun onClick(view : View, position : Int)
    }

    var itemClick : ItemClick? = null  //클릭이벤트추가부분

    override fun getItemCount(): Int {
        return profileList.size
    }

    override fun onCreateViewHolder(parent: ViewGroup, viewType: Int): CustomAdapter.Holder {
        val binding = ItemRecyclerviewBinding.inflate(LayoutInflater.from(parent.context), parent, false)
        return Holder(binding)
    }

    override fun onBindViewHolder(holder: CustomAdapter.Holder, position: Int) {
        holder.itemView.setOnClickListener {  //클릭이벤트추가부분
            itemClick?.onClick(it, position)
        }
        holder.name.text = profileList[position].name
        holder.age.text = profileList[position].age.toString()
    }

    inner class Holder(val binding: ItemRecyclerviewBinding) : RecyclerView.ViewHolder(binding.root) {
        val name = binding.rvName
        val age = binding.rvAge
    }
}
class MainActivity : AppCompatActivity() {
    private val binding by lazy { ActivityMainBinding.inflate(layoutInflater) }

    override fun onCreate(savedInstanceState: Bundle?) {
        super.onCreate(savedInstanceState)
        setContentView(binding.root)

        val profileList = ArrayList<Profile>()
        profileList.add(Profile("홍길동", 20))
        profileList.add(Profile("홍길동", 21))
        profileList.add(Profile("홍길동", 22))
        profileList.add(Profile("홍길동", 23))
        profileList.add(Profile("홍길동", 24))
        profileList.add(Profile("홍길동", 25))
        profileList.add(Profile("홍길동", 26))
        profileList.add(Profile("홍길동", 27))
        profileList.add(Profile("홍길동", 28))
        profileList.add(Profile("홍길동", 29))
        profileList.add(Profile("홍길동", 30))
        profileList.add(Profile("홍길동", 31))
        profileList.add(Profile("홍길동", 32))
        profileList.add(Profile("홍길동", 33))
        profileList.add(Profile("홍길동", 34))
        profileList.add(Profile("홍길동", 35))
        profileList.add(Profile("홍길동", 36))
        profileList.add(Profile("홍길동", 37))

        val adapter = CustomAdapter(profileList)
        binding.rv.adapter = adapter
        binding.rv.layoutManager = LinearLayoutManager(this)

        adapter.itemClick = object : CustomAdapter.ItemClick {  //클릭이벤트추가부분
            override fun onClick(view: View, position: Int) {
                Toast.makeText(this@MainActivity, profileList[position].age.toString(), Toast.LENGTH_LONG).show()
            }
        }
    }
}'Android-Kotlin > Android' 카테고리의 다른 글
| [Android] DataClass 란? (0) | 2022.06.25 |
|---|---|
| [Android] Fragment 개념 및 간단 사용방법 Kotlin (0) | 2022.06.19 |
